Forex Range Trading Strategy: Free Range Detector Guide

What “Range Trading” Means in Forex (And Why It Still Works)
Range trading is the “buy near the floor, sell near the ceiling” style of trading. In forex, price often moves sideways for hours (sometimes days), bouncing between support (a common low area) and resistance (a common high area). When that sideways behavior is clear and stable, range trading can feel almost… calm. Not easy—but calmer than chasing wild trends.
Range-Bound vs Trending Markets
A ranging market is one where price keeps returning to the same general upper and lower levels. A trending market keeps making new highs (uptrend) or new lows (downtrend). The big challenge is simple: range strategies suffer when a new trend starts, because breakouts can smash through your range boundary.
Why Price Respects Support and Resistance
Support and resistance aren’t magic. They’re just areas where lots of traders (and algorithms) make decisions—take profit, enter, hedge, or set stops. When many orders cluster in similar zones, price often reacts there again.
That’s why a smart tool like a Forex Range Trading Strategy Free Range Detector Indicator can help: it tries to identify those “repeat reaction zones” quickly and consistently.
How a Free Range Detector Indicator Helps (What It Detects)
A range detector indicator usually does three practical things:
- Draws a box or band around a recent sideways area
- Marks the range high and range low
- Often adds a “range quality” clue (strong/weak, tight/loose)
On TradingView, there are scripts specifically designed to identify range-bound conditions and show the levels clearly.
Range High / Range Low
These are your key decision points:
- Range Low (Support): where you look for buys (with confirmation)
- Range High (Resistance): where you look for sells (with confirmation)
Range Strength and “Compression” Clues
Some detectors look for “quiet market” behavior—where volatility compresses and price chops in a narrow zone before expanding again. Many “range box” or “breakout box” indicators are built around this idea.
Volatility Tools Behind Many Range Detectors (ATR, Bands, Channels)
A lot of range detection logic is built on classic volatility measures like:
- ATR (Average True Range) to measure typical movement size
- Bollinger Bands to visualize volatility and potential overextension
- Keltner Channels (often EMA + ATR bands) for volatility envelopes
Core Tools You Need for This Strategy
You can range trade with naked charts, but tools make it faster and more consistent.
Support/Resistance Boxes
Your free range detector should draw zones (or at least boundaries). If it doesn’t, you can manually box the range.
ATR for Stops and “Too-Choppy” Filters
ATR helps you answer:
“How big is normal movement right now?”
ATR is widely used as a volatility gauge and is typically calculated from true ranges averaged over a period (often 14).
Bollinger Bands or Keltner Channels for Range Quality
If bands are wide and expanding, that’s often a warning: conditions may be shifting. If they’re tight and stable, ranges are more likely to behave. (Not guaranteed—just more likely.)
The Complete Forex Range Trading Strategy Rules (Entry, Stop, Take Profit)
Below is a clean, rule-based plan you can run with your Forex Range Trading Strategy Free Range Detector Indicator.
Rule 1: Pick the Right Sessions and Pairs
Ranges show up everywhere, but they’re cleaner when:
- spreads are reasonable
- price isn’t exploding from news
- the pair isn’t in a strong trend
Many traders like major pairs for this because spreads are often lower and price behavior can be smoother.

Rule 2: Confirm It’s a Real Range (3-Point Checklist)
Only trade ranges that pass all three:
- At least 2 clean touches near the range high and 2 near the range low
- The middle of the box is “messy,” but the edges are respected (clear rejections)
- Volatility isn’t expanding aggressively (ATR stable-ish; bands not blasting open)
If your indicator includes a range score/strength hint, treat it as a helper—not a judge.
Rule 3: Buy Low, Sell High (Mean Reversion Entries)
Buy Setup (near range low):
- Price touches or slightly dips below range low
- You see rejection (like a strong wick) OR a small reversal pattern
- Optional: oscillator divergence or band “snap back” confirmation
Sell Setup (near range high):
- Price touches or slightly pokes above range high
- Rejection appears
- Optional confirmation as above
The big idea: don’t buy the middle; buy the edge.
Rule 4: Stops That Make Sense (ATR-Based)
A simple stop method:
- Stop distance = 1.0 × ATR (14) beyond the range boundary
- Buying near support? Stop goes below the range low by about 1 ATR
- Selling near resistance? Stop goes above the range high by about 1 ATR
ATR is designed to reflect typical movement size, so it’s a practical “breathing room” measure.
Rule 5: Take-Profit Targets (Partial + Full Exits)
Use a two-step target plan:
- TP1 (partial): at the midpoint of the range (lock something in)
- TP2 (final): near the opposite boundary (range high for buys, range low for sells)
This is boring—but boring is often profitable.
Breakout Protection: How to Avoid Getting Trapped
Range trading is basically picking fights with breakouts. So you need armor.
Fake Breakout Warning Signs
Be cautious when:
- price closes strongly outside the range (not just a wick)
- ATR starts rising fast
- bands/channels expand quickly
- a major session open hits (London/NY) and volume increases
Breakout-oriented indicators often highlight when ranges transition into expansion phases.
The “Two-Close Rule” and Retest Rule
Two simple protective rules:
- Two-Close Rule: If you get two candle closes outside the box on your trading timeframe, stop treating it like a range.
- Retest Rule: If price breaks out and then retests the boundary from the other side and holds, that range is likely “done.”
These rules keep you from stubbornly fading a real move.
Free Range Detector Indicator Setup Examples (MT4/MT5/TradingView)
You can find free indicators for platforms like MetaTrader and TradingView, including categories that collect downloadable indicator tools.
TradingView also hosts many public scripts that detect ranges and range breakouts.
What Settings Usually Matter Most
Most range detectors have a few common inputs:
- Lookback period: how many candles it scans for ranges
- Minimum range width: filters tiny, noisy boxes
- Breakout confirmation: close outside, wick outside, volume filter, etc.
- Session window: some tools track specific time ranges (like morning ranges)
A practical starting point:
- short-term range trading: 20–60 candle lookback
- higher timeframes: 50–200 candle lookback
Common Mistakes with Indicator Settings
- Setting the lookback too small (you get “micro ranges” that break constantly)
- Ignoring spread/fees (tiny ranges don’t pay after costs)
- Treating the indicator like a fortune teller (it’s just a measuring tape)
Risk Management for Range Trading (The Non-Negotiables)
This is the part traders “know,” then ignore—until the market punishes them.
Position Sizing in One Simple Formula
- Choose risk per trade (example: 1%)
- Measure stop size in pips
- Use a position size calculator or broker sizing to match your risk
If your stop is wider because ATR is higher, your position should be smaller. That’s how you survive.
Daily Loss Limits and Trade Caps
Two guardrails that help a lot:
- Max 2–3 losing trades per day → then stop
- Max daily drawdown (example: 2%–3%) → then stop
Ranges can lure you into overtrading because setups appear “often.” Protect your mind and your money.
Backtesting and Practice Checklist
Before you risk real cash, do at least 30–50 sample trades in a demo or replay.

Powerful Forex VPS for MT4 & MT5 – Best Price
182 in stock
$44.99 $359.99Price range: $44.99 through $359.99| Validity | Monthly, Quarterly, Semi Annually, Annually |
|---|
What to Record in Your Journal
Track:
- pair + timeframe
- range width (pips)
- ATR value
- entry reason (what confirmed the edge)
- stop placement method
- outcome (TP1/TP2 or stop)
- screenshot
After 50 trades, patterns will smack you in the face (in a good way).
When to Skip a Range
Skip if:
- the range is too narrow to beat spreads
- news is imminent
- you see strong trending structure on a higher timeframe
- edges aren’t clean (price slices through boundaries)
FAQs: Forex Range Trading Strategy + Free Range Detector Indicators
1) What is a Forex Range Trading Strategy Free Range Detector Indicator used for?
It’s used to spot range-bound price behavior and mark likely support/resistance boundaries so you can trade bounces (or prepare for breakouts).
2) Is range trading better than trend trading?
Neither is “better.” Range trading works best when markets are sideways; trend trading works best when markets are moving strongly in one direction.
3) What indicator is best for measuring range volatility?
ATR is one of the most common volatility tools because it measures average movement size over time.
4) Can Bollinger Bands help confirm a range?
Yes—Bollinger Bands are often used to visualize volatility and potential overextension around a moving average.
5) What timeframe works best for range trading in forex?
Many traders use M15 to H1 for active range trades and H4 to Daily for slower, cleaner ranges. The “best” timeframe is the one you can execute consistently.
6) Where can I find free range detector indicators?
Some sites collect free indicators for platforms like MT4/MT5/cTrader, and TradingView has many public range scripts.
7) How do I avoid fake breakouts?
Use simple rules like two candle closes outside the range and/or waiting for a retest before changing your bias.
Conclusion: Build a Simple, Repeatable Range Routine
A Forex Range Trading Strategy Free Range Detector Indicator is most useful when you treat it like a clean assistant—not a signal vending machine. Let it draw the structure, then you apply rules: confirm the range, trade only at the edges, use ATR-based stops, take partial profits, and stop fighting real breakouts.
If you want a simple next step: pick one pair, one timeframe, one set of rules from this article, and run 50 practice trades. Consistency beats “perfect settings” every day.


Most Popular Forex EA

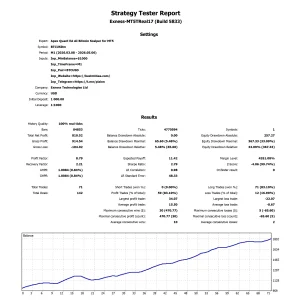
Apex Quant BTCUSD EA: AI Bitcoin Scalper for MT5
In stock
$0.00 $159.99Price range: $0.00 through $159.99

AVA AIGPT5 XAUUSD EA: AI Gold Scalper for MT4
In stock
$0.00 $679.99Price range: $0.00 through $679.99
Elysium Vortex EURCAD EA: AI EURCAD Scalper for MT5
In stock
$0.00 $199.99Price range: $0.00 through $199.99
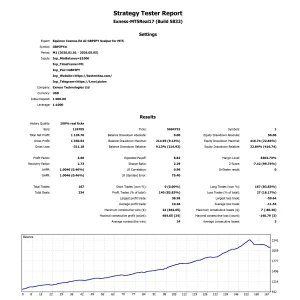
Equinox Cosmos GBPJPY EA: AI GBPJPY Scalper for MT5
In stock
$0.00 $399.99Price range: $0.00 through $399.99


Golden Deer Holy Grail Indicator (Lifetime Premium)
324 in stock
Original price was: $1,861.99.$187.99Current price is: $187.99.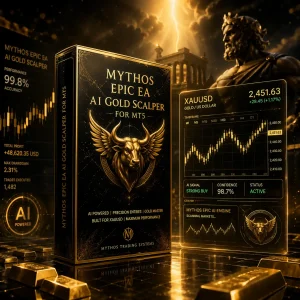
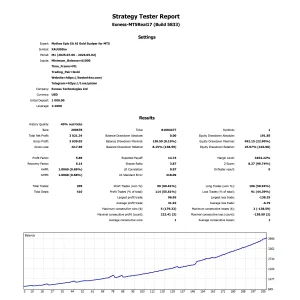
Mythos Epic XAUUSD EA: AI Gold Scalper for MT5
In stock
$0.00 $849.99Price range: $0.00 through $849.99
Nexora Manus XAUUSD EA: AI Gold Scalper for MT5
In stock
$0.00 $699.99Price range: $0.00 through $699.99
Obsidian Aether EURUSD EA: AI Grid Scalper for MT5
47 in stock
$0.00 $797.99Price range: $0.00 through $797.99
Onix Stratos XAUUSD EA: AI Smart Scalper for MT5
In stock
$0.00 $999.99Price range: $0.00 through $999.99
Powerful Forex VPS for MT4 & MT5 – Best Price
182 in stock
$44.99 $359.99Price range: $44.99 through $359.99 Gold Forex EA