SMC Market Structure & MTF Levels by Capitan-Trading Forex Indicator Reviews: The Ultimate Honest Guide (9 Key Insights)

If you’ve been trying to trade Smart Money Concepts (SMC) without turning your chart into a messy art project, you’ve probably searched for tools that highlight market structure and multi-timeframe (MTF) levels clearly. That’s exactly the promise behind the SMC Market Structure & MTF Levels tool by Capitan-Trading: it aims to visualize structure shifts (like CHoCH/BOS), plot major previous highs/lows across timeframes, and even show session boxes—without clutter.
Below is a practical, trader-minded breakdown—what it does well, where it can mislead you, and how to use it without falling into the classic “indicator dependency” trap.
What This Indicator Is and Why Traders Care
The indicator is positioned as a utility tool for market structure + key reference levels. Rather than “predicting” price, it helps you organize context:
- Structure shifts: labels like CHoCH (Change of Character) and BOS (Break of Structure)
- MTF reference levels: prior Daily/Weekly/Monthly highs and lows
- Session visualization: customizable session boxes
- Dashboard context: bias and distance-to-level metrics
That’s valuable because many Forex traders lose money not due to entries alone, but because they enter in the wrong place on the map—for example, shorting right above a previous day low, or buying into a weekly high.
Quick definition: SMC, Market Structure, and MTF Levels
- SMC market structure commonly focuses on whether price is making higher highs/higher lows (bullish) or lower highs/lower lows (bearish), and where the “shift” occurs (CHoCH) versus continuation (BOS).
- MTF levels like PDH/PDL (Previous Day High/Low) and PWH/PWL act as magnets and reaction zones because they’re widely watched and often tied to liquidity.
Who it’s built for (day traders vs swing traders)
Based on its described design—structure + MTF + sessions—it fits best for:
- Day traders who plan around session highs/lows and PDH/PDL
- Swing traders who want clean structure confirmation and major weekly/monthly reference points
Core Features Breakdown (What You Actually Get)
Market structure engine: CHoCH and BOS logic
The script describes using pivot highs/lows (TradingView’s pivot functions) to detect swings, then triggers a bullish shift when price closes above the last pivot high, and bearish when it closes below the last pivot low—optionally requiring candle-close confirmation.
Pivot highs/lows sensitivity settings
This matters a lot. If pivots are too sensitive, you’ll get constant “structure” spam. If too slow, you’ll miss the early shift.
A practical approach:
- Start less sensitive on higher timeframes (4H/1H)
- Increase sensitivity on execution timeframes (15m/5m) only if you need it
“Confirmed only” option to reduce fakeouts
The PRO description calls out a “Confirmed Only” feature to avoid triggering structure breaks during a still-forming candle. This is a real quality-of-life feature for live trading because a wick can “break” and then snap back.
Multi-timeframe levels: PDH/PDL, PWH/PWL, PMH/PML
The indicator plots previous period highs/lows for daily, weekly, and monthly. This is one of the most useful “boring” tools you can add to Forex charts—because it’s simple and it keeps you honest.
Staggered labels to prevent chart overlap
A surprisingly big deal: the script describes staggering line projection lengths (so labels don’t stack on top of each other when levels align). That’s not “sexy,” but it’s what makes an indicator usable every day.
Session boxes: Asia, London, New York workflow
Both versions describe customizable session boxes (often called killzones). This helps you see:

- Where ranges form (Asia)
- Where volatility expands (London/NY overlaps)
- When not to force trades in dead zones
Dashboard: bias + distance-to-level context
The script describes a minimalist dashboard that shows bias and the percentage distance to major MTF levels—useful for quick “am I near a magnet?” checks.
PRO Version Highlights (If You’re Comparing)
The PRO page adds advanced concepts commonly used in SMC-style workflows:
Liquidity sweeps and unmitigated pools
It describes drawing projected liquidity pools and detecting sweeps based on wick or close rules.
FVG mapping after sweeps
It claims that after a sweep, it scans for a Fair Value Gap (FVG) within a user-defined bar window and highlights it.
Hunt Zone alerts
The dashboard can flag a “Hunt Zone” when price gets within a threshold distance of major liquidity, visually warning of sweep/reversal risk.
Plain-English takeaway: the PRO feature set is more “SMC complete,” but it also increases the risk that newer traders treat drawings as trade signals. Use it as context, not commands.
How to Use It Step-by-Step (Top-Down Routine)
Here’s a clean routine that keeps you from overtrading:
1) Higher timeframe bias first (Daily/4H)
- Mark weekly and daily previous highs/lows
- Note whether structure is printing bullish or bearish
- Decide your “allowed direction” for the day
2) Intraday execution second (15m/5m)
- Wait for price to approach a major MTF level (PDH/PDL, PWH/PWL)
- Watch for a sweep + structure shift (if using PRO concepts)
- Only then look for an entry model you already trust
3) Session-based plan
- Asia: identify range
- London: watch for expansion or sweep of Asia extremes
- NY: continuation or reversal depending on where price sits relative to weekly/daily levels
This matches how the tool is described: maintaining a top-down perspective with structure and liquidity magnets.
Best Settings for Forex (Practical Starting Points)
Because brokers, pairs, and volatility differ, there’s no magic preset. But you can choose a sensible starting posture:
Conservative structure (less noise)
- Higher pivot lookback (more confirmation)
- “Confirmed only” ON (if available)
- MTF levels ON (daily/weekly), monthly optional
Best for: beginners, swing traders, and news-heavy pairs.
Reactive structure (more signals)
- Lower pivot lookback (faster)
- “Confirmed only” OFF only if you can handle whipsaws
- Keep MTF levels ON but limit label density
Best for: experienced scalpers who already manage risk tightly.
MTF visibility rules (avoid clutter)
A simple rule:
- On 5m/15m: show PDH/PDL + PWH/PWL
- On 1H/4H: show weekly + monthly more prominently
Strengths, Weaknesses, and What Reviewers Usually Miss
Strengths
- Great chart hygiene: structure + MTF + sessions in one place
- More objective structure labeling: helps reduce “I think it’s bullish” bias
- MTF level organization: staggered visuals improve readability
Weaknesses
- Context dependency: structure labels aren’t trade signals
- Chop risk: pivots will flip often in ranges (Forex ranges a lot)
- False confidence: more drawings can feel like more certainty (it’s not)
What most reviews miss: the indicator doesn’t replace a trading plan. It replaces messy chart work.
Common Mistakes and How to Avoid Them
Mistake 1: Treating CHoCH/BOS like “buy/sell now”
Fix: Only act when a structure shift occurs at a meaningful location (near PDH/PDL, session extremes, weekly levels).
Mistake 2: Ignoring news volatility
Structure can “break” during spikes and reverse instantly. Always know your calendar and reduce size when volatility is abnormal.
Mistake 3: Using every feature at once
Fix: Start with MTF levels + structure only. Add sessions next. Add PRO sweep/FVG tools only after you’ve proven consistency.

Powerful Forex VPS for MT4 & MT5 – Best Price
In stock
$44.99 $359.99Price range: $44.99 through $359.99| Validity | Monthly, Quarterly, Semi Annually, Annually |
|---|
Backtesting and Trust (Repainting, Lookahead, and Reality)
Two practical notes:
- “Confirmed only” means the label triggers on candle close, which generally reduces live-bar flip-flopping.
- For MTF levels, the script describes using TradingView’s
request.securityin a way intended to avoid lookahead bias. Still, you should visually sanity-check on replay and live charts and keep expectations realistic.
Who Should Use It (And Who Shouldn’t)
Use it if you are
- A discretionary trader who wants a cleaner map
- Someone learning structure who benefits from consistent labeling
- A session-based Forex trader
Avoid it if you are
- Hunting for “98% win rate signals”
- Not using stops / risk rules
- Expecting the tool to “predict” reversals for you
FAQs
1) Is this indicator a complete trading strategy?
No. It’s best treated as a context and mapping tool (structure + key levels), not a full entry/exit system.
2) What timeframes work best with it?
Most traders do top-down: 4H/1H for bias, 15m/5m for execution. The tool is described as usable on any timeframe to keep perspective.
3) What are PDH/PDL and why do they matter in Forex?
They’re the previous day’s high/low—often liquidity targets and reaction areas, especially during London/NY volatility.
4) Does the PRO version add meaningful value?
If you actively trade liquidity sweeps and FVG reactions, yes—the PRO description includes sweep detection, FVG mapping, and proximity “Hunt Zone” alerts.
5) Will CHoCH/BOS labels be wrong sometimes?
They can flip in choppy markets because pivots form frequently in ranges. That’s not “broken”—that’s market condition. Use higher-timeframe filters and major levels.
6) Can beginners use this safely?
Yes—if they keep it simple: start with MTF levels + confirmed structure, and trade small while learning.
Conclusion and Final Recommendation
If your charts feel chaotic and you want a cleaner way to see structure shifts + major MTF highs/lows + sessions, this tool’s feature set is genuinely practical—especially the readable MTF labeling and structure logic described on TradingView.
The only real danger is psychological: more drawings can trick you into thinking you have more certainty. Use it like a map, not a GPS. Combine it with risk management, a clear entry model, and a simple daily plan.
Most Popular Forex EA

Onix Stratos XAUUSD EA: AI Smart Scalper for MT5
In stock
$0.00 $999.99Price range: $0.00 through $999.99
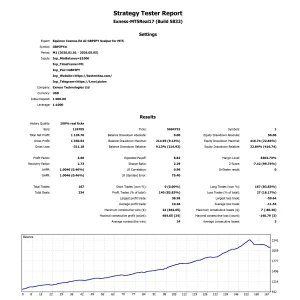
Elysium Vortex EURCAD EA: AI EURCAD Scalper for MT5
In stock
$0.00 $199.99Price range: $0.00 through $199.99
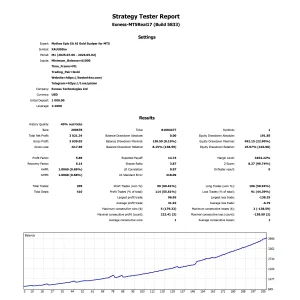
Equinox Cosmos GBPJPY EA: AI GBPJPY Scalper for MT5
In stock
$0.00 $399.99Price range: $0.00 through $399.99
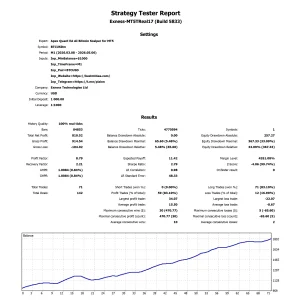
Apex Quant BTCUSD EA: AI Bitcoin Scalper for MT5
In stock
$0.00 $159.99Price range: $0.00 through $159.99
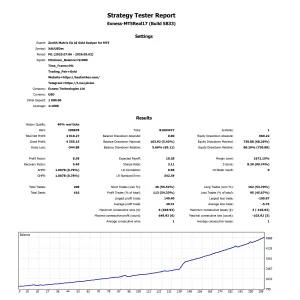
Zenith Matrix XAUUSD EA: AI Gold Scalper for MT5
In stock
$0.00 $899.99Price range: $0.00 through $899.99
Nexora Manus XAUUSD EA: AI Gold Scalper for MT5
In stock
$0.00 $699.99Price range: $0.00 through $699.99
Mythos Epic XAUUSD EA: AI Gold Scalper for MT5
In stock
$0.00 $849.99Price range: $0.00 through $849.99

Obsidian Aether EURUSD EA: AI Grid Scalper for MT5
In stock
$0.00 $797.99Price range: $0.00 through $797.99

AVA AIGPT5 XAUUSD EA: AI Gold Scalper for MT4
In stock
$0.00 $679.99Price range: $0.00 through $679.99


Golden Deer Holy Grail Indicator (Lifetime Premium)
In stock
Original price was: $109.99.$87.99Current price is: $87.99.
Powerful Forex VPS for MT4 & MT5 – Best Price
In stock
$44.99 $359.99Price range: $44.99 through $359.99

 Gold Forex EA