10 Powerful Ways to Use a Free Choke Points Indicator for Supply Demand Zones (Ultimate Trading Guide)

The 10 Best Ways to Use a Free Choke Points Indicator for Supply Demand Zones (Powerful Guide)
The world of technical analysis is packed with tools, signals, and indicators—but few are as effective and adaptive as a free choke points indicator for supply demand zones. This tool helps traders spot price levels where the market experiences hesitation, consolidation, or reversal due to imbalances between buyers and sellers. In simple terms, choke points reveal the market’s pressure spots before major moves happen.
Throughout this guide, you’ll learn how these indicators work, how to use them properly, and how to combine them with smarter trading strategies. Whether you trade forex, crypto, indices, or stocks, choke points and supply–demand zones will help you trade with more confidence and clarity.
Understanding the Free Choke Points Indicator for Supply Demand Zones
A free choke points indicator for supply demand zones maps areas where price consistently reacts. These reactions reflect powerful forces behind the chart—institutions placing orders, retail traders reacting emotionally, or liquidity building up for a breakout.
Why Choke Points Matter in Price Action
Choke points matter because they show areas where:
- Price stalls due to uncertainty
- Liquidity pools gather
- Market makers target stop-loss clusters
- Reversals often begin
- Breakouts gain their initial energy
When you detect a choke point early, you’re observing what large market participants are quietly preparing.
Core Concepts Behind Supply & Demand Zones
Supply and demand zones represent places where big buy or sell orders have previously caused dramatic shifts in price. A supply zone pushes price down; a demand zone pushes price up. When paired with choke points, these zones become even more precise, filtering out false signals and showing clearer opportunities.
How a Free Choke Points Indicator for Supply Demand Zones Works
This indicator typically analyzes volatility, order flow behavior, and structural imbalances to create visual levels on your chart.
Identifying Liquidity Pools
Liquidity pools are clusters of stop-losses or pending orders. Choke points often form right above or below these pools. After the liquidity is taken, price frequently reverses, making it an ideal location for entries.
Recognizing Market Structure Breaks
Choke points often signal the early formation of:
- Break of Structure (BOS)
- Change of Character (CHOCH)
These structure breaks are crucial clues for potential trend reversals or continuations.
Pinpointing Institutional Price Levels
When institutions accumulate or distribute orders, price compresses. This compression creates the choke point effect. Your indicator highlights these compression zones so you can anticipate potential direction shifts.

Setting Up the Indicator on Popular Trading Platforms
Most traders use TradingView, MT4, or MT5. Many free indicators exist, especially community scripts that detect choke points and supply–demand zones automatically.
Best Settings for Accuracy
- Use default sensitivity for beginners
- Activate “show historical zones”
- Set filtering to medium or strict
- Use multi-timeframe analysis for refinement
Common Mistakes Traders Make
Many traders:
- Rely only on a single timeframe
- Treat every choke point as a reversal
- Enter trades without confirming confluence
- Ignore liquidity direction
Avoiding these mistakes ensures your analyses remain stable and reliable.
Advanced Strategies Using Choke Points & Supply Demand Areas
Let’s look at real trading setups where the indicator shines.
Scalping Using Choke Point Reversals
For scalpers, choke points provide quick reaction zones where price hesitates before moving. Identify:
- Liquidity sweep
- Re-entry candle
- Momentum shift
Entry & Exit Examples
- Wait for liquidity to be swept
- Look for a bullish/bearish engulfing candle
- Enter on retest
- Set TP at nearest opposite zone
Swing Trading with Multi-Timeframe Zones
Swing traders can use HTF supply–demand levels to locate macro turning points.
Confluence Signals to Look For
- EMA trend confirmation
- Relative volume spikes
- Fair value gaps (FVG)
- Market structure shifts
Combining these gives you high-probability setups.
Using the Free Choke Points Indicator for Supply Demand Zones to Avoid False Breakouts
False breakouts trap traders. Choke points highlight hesitation before the market chooses a direction.
Spotting Liquidity Grabs Early
A liquidity grab often occurs when:
- Price wicks above/below previous highs or lows
- Volume temporarily spikes
- The candle closes back inside the range
This move usually precedes the real trend.
Filtering Out Weak Zones
Weak zones often have:
- Minimal displacement
- Poor follow-through
- No structural confirmation
Your choke point indicator helps filter these out automatically.
Comparing Free vs Paid Choke Point Indicators
| Feature | Free Indicator | Paid Indicator |
|---|---|---|
| Cost | $0 | Varies |
| Zone Detection | Moderate | High precision |
| Customization | Limited | Extensive |
| Alerts | Basic | Advanced |
| Support | Community | Developer support |
For many traders, free tools are more than enough, especially when combined with smart trading habits.
Best Trading Practices When Using Choke Point Indicators
Risk Management Blueprint
Always follow:
- 1–2% risk per trade
- Clear stop-loss placement below zone
- Defined take-profit targets
Backtesting for Optimal Results
Backtesting lets you:
- Evaluate historical performance
- Adjust settings
- Improve discipline
- Build confidence
You can start with TradingView’s free replay mode.
FAQs About the Free Choke Points Indicator for Supply Demand Zones
1. Is a free choke points indicator accurate enough for live trading?
Yes—when paired with confluence, it performs very well.
2. Can I use it in forex, crypto, and stocks?
Absolutely. Price action behaves similarly across assets.
3. Does it repaint?
Some free indicators repaint; choose one that clearly states “non-repainting.”
4. Which timeframe is best?
Use higher timeframes for direction and lower timeframes for precision.
5. Can beginners use this indicator?
Yes, especially due to its visual, easy-to-understand nature.
6. Do I need premium tools?
No—free indicators work great when used with solid analysis.
Conclusion
A free choke points indicator for supply demand zones gives traders a powerful lens for interpreting market structure, liquidity behavior, and potential reversals. When used wisely, it reduces noise, sharpens accuracy, and supports confident decision-making.
Combined with smart risk management and consistent backtesting, this tool can drastically improve your trading journey.


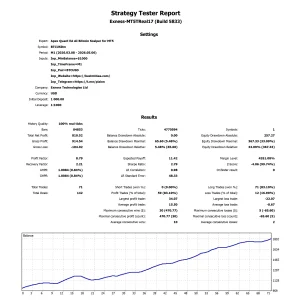
Apex Quant EA: AI Bitcoin Scalper for MT5
In stock
$0.00 $999.99Price range: $0.00 through $999.99

AVA AIGPT5 EA: AI Gold Scalper for MT4
In stock
$0.00 $679.99Price range: $0.00 through $679.99
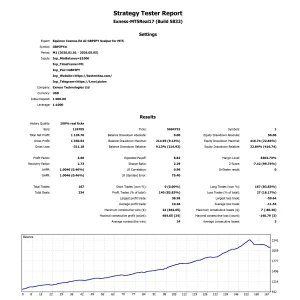
Equinox Cosmos EA: AI GBPJPY Scalper for MT5
In stock
$0.00 $599.99Price range: $0.00 through $599.99


Golden Deer Holy Grail Indicator (Lifetime Premium)
324 in stock
Original price was: $1,861.99.$187.99Current price is: $187.99.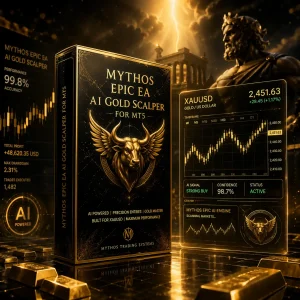
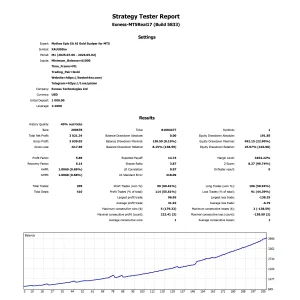
Mythos Epic EA: AI Gold Scalper for MT5
In stock
$0.00 $849.99Price range: $0.00 through $849.99
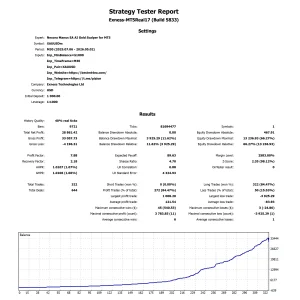
Nexora Manus EA: AI Gold Scalper for MT5
In stock
$0.00 $499.99Price range: $0.00 through $499.99
Powerful Forex VPS for MT4 & MT5 – Best Price
182 in stock
$44.99 $359.99Price range: $44.99 through $359.99

Top 2000 Trading Tools for Forex Success (EA & Indicator)
In stock
Original price was: $9,999.99.$0.00Current price is: $0.00.
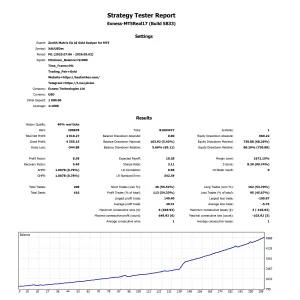
Zenith Matrix EA: AI Gold Scalper for MT5
In stock
$0.00 $899.99Price range: $0.00 through $899.99