12 Powerful Ways the Volume Profile Indicator for Forex Boosts Trading Accuracy

The Ultimate Guide to Using the Volume Profile Indicator for Forex
The volume profile indicator for forex is becoming one of the most powerful tools for traders who want to understand where the market is most active. Because forex doesn’t have centralized volume data, many traders believe volume tools don’t work—but that couldn’t be further from the truth. When used correctly, the volume profile gives deep insight into liquidity, market structure, and future price reactions. In this guide, we’ll break down exactly how it works and how you can use it to improve accuracy and confidence in your trading decisions.
Understanding the Volume Profile Indicator
What Is Volume in Forex Trading?
Unlike the stock market, the forex market is decentralized. This means there’s no single source of “true” volume. Instead, brokers provide tick volume, which counts how many times the price changes. Decades of market research show that tick volume correlates strongly with real institutional volume—making it extremely valuable for traders.
Difference Between Volume Profile & Regular Volume
Regular volume indicators show spikes at the bottom of a chart. The volume profile, however, shows volume horizontally along the price axis. This reveals exactly which price levels produced the highest activity. It visually highlights:
- Areas where buyers and sellers are in strong agreement
- Areas where price is rejected quickly
- Imbalances that can lead to future moves
Key Components: POC, VAH, VAL, and Nodes
The volume profile has four main elements:
- POC (Point of Control): The price with the highest traded volume
- VAH (Value Area High): Upper range of strong participation
- VAL (Value Area Low): Lower range where activity is concentrated
- High-Volume Nodes (HVN): Strong support/resistance
- Low-Volume Nodes (LVN): Thin areas that price moves through quickly
How the Volume Profile Indicator for Forex Works
Market Structure & Liquidity Zones
The indicator reveals where liquidity clusters. Price often reacts at these points because institutions place large orders near HVNs and POC zones.
Price Acceptance vs. Price Rejection Areas
- Acceptance: Price stays and consolidates near HVNs
- Rejection: Price gets pushed away from LVNs
This supports prediction of future price reactions.
How Brokers Measure Tick Volume
Tick volume rises during high institutional activity. Because big players cause most price changes, tick volume mirrors real buying and selling pressures.
Why Forex Traders Use the Volume Profile Indicator
Identifying High-Probability Reversal Zones
Rejections from VAL or VAH often predict powerful reversals because these levels are where traders perceive price as unfair.
Pinpointing Breakout and Breakdown Levels
Breakouts are more meaningful when price moves through a low-volume pocket—there’s less resistance.
Supporting Trend Analysis & Confirmation
When POC shifts upward, the market is likely trending up; a falling POC suggests bearish pressure.

Setting Up the Volume Profile Indicator for Forex
Choosing the Right Trading Platform
MT4/MT5 Add-Ons
MetaTrader users often install third-party tools to enable volume profile functionality.
TradingView’s Built-In Tools
TradingView offers a clean and accurate native volume profile system.
Best Settings for Scalpers, Day Traders & Swing Traders
- Scalpers: Use shorter session profiles
- Day traders: Use fixed range profiles
- Swing traders: Use visible range profiles for market context
Practical Trading Strategies Using Volume Profile
Strategy 1: Value Area Breakout Setup
When price breaks VAH or VAL with strong momentum, continuation is likely.
Strategy 2: POC Reversal Strategy
The POC often acts as a magnet for price. Reversals occur frequently at this level due to heavy liquidity.
Strategy 3: Low-Volume Node Retracement
Price tends to “slice through” LVNs quickly. Traders use LVNs to anticipate rapid moves.
Combining Volume Profile with Other Indicators
Volume Profile + Moving Averages
Adds trend direction to volume-based zones for improved accuracy.
Volume Profile + RSI Divergence
Great for spotting reversals near major HVNs.
Volume Profile + Market Structure
Helps confirm breakouts, retests, and trend continuation patterns.
Common Mistakes When Using the Volume Profile Indicator
Misinterpreting Tick Volume
Some traders assume tick volume is unreliable—it’s not. It correlates closely with real institutional volume.
Using the Indicator Alone
Context matters. Pair volume profile with structure and trend analysis.
Adding Too Many Indicators
Simplicity is key. Overloading your chart can cloud your judgment.
Advanced Tips to Master the Volume Profile
Sourcing Institutional Liquidity Data
Some advanced traders also use futures volume from CME to benchmark forex movement.
Using Session Profiles
Each trading session—Asian, London, New York—creates unique liquidity signatures.
Building a Rule-Based System
Develop rules for entry, stop-loss, and take-profit based on VAH, VAL, LVN, and HVNs.
FAQs About the Volume Profile Indicator for Forex
1. Is the volume profile indicator accurate for forex?
Yes, because tick volume highly correlates with actual institutional volume.
2. Can beginners use the volume profile indicator?
Absolutely. Once you understand its basic components, it becomes intuitive.
3. Is tick volume reliable in all currency pairs?
Major pairs show the strongest reliability due to higher liquidity.
4. What is the best timeframe to use?
Volume profile works well on all timeframes, depending on your trading style.
5. Can I use volume profile for scalping?
Yes—session profiles and fixed range tools work extremely well for scalpers.
6. What’s the difference between visible range and session profile?
Visible range adjusts based on your zoom level; session profiles create separate daily or intraday distributions.
Conclusion
The volume profile indicator for forex is easily one of the most powerful tools available to traders. It exposes hidden liquidity, reveals strong reversal zones, and helps forecast market movement with impressive accuracy. When combined with solid market structure and risk management, it becomes a game-changing system for traders of all skill levels.


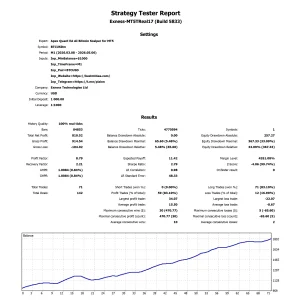
Apex Quant EA: AI Bitcoin Scalper for MT5
In stock
$0.00 $999.99Price range: $0.00 through $999.99

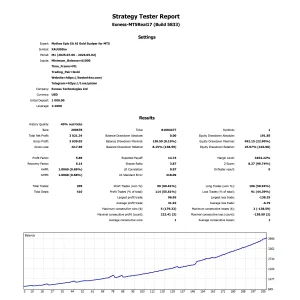
AVA AIGPT5 EA: AI Gold Scalper for MT4
In stock
$0.00 $679.99Price range: $0.00 through $679.99
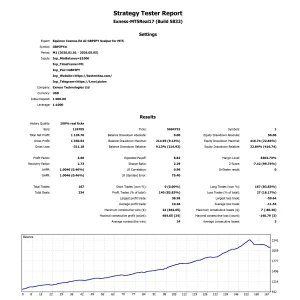
Equinox Cosmos EA: AI GBPJPY Scalper for MT5
In stock
$0.00 $599.99Price range: $0.00 through $599.99


Golden Deer Holy Grail Indicator (Lifetime Premium)
324 in stock
Original price was: $1,861.99.$187.99Current price is: $187.99.
Mythos Epic EA: AI Gold Scalper for MT5
In stock
$0.00 $849.99Price range: $0.00 through $849.99
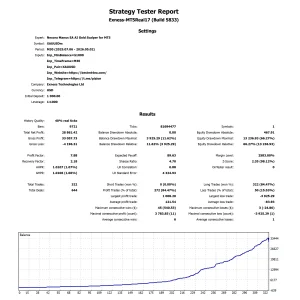
Nexora Manus EA: AI Gold Scalper for MT5
In stock
$0.00 $499.99Price range: $0.00 through $499.99
Powerful Forex VPS for MT4 & MT5 – Best Price
182 in stock
$44.99 $359.99Price range: $44.99 through $359.99

Top 2000 Trading Tools for Forex Success (EA & Indicator)
In stock
Original price was: $9,999.99.$0.00Current price is: $0.00.
Zenith Matrix EA: AI Gold Scalper for MT5
In stock
$0.00 $899.99Price range: $0.00 through $899.99